How to Use the 8g Cream Chargers for Whipped Cream?

1.Fill your cream dispenser with heavy whipping cream and your favorite syrups.

2.Insert one 8g whipped cream charger into the cartridge holder.

3.Screw the holder onto the dispenser until you hear the gas release.

4.Shake for a 8-10 seconds, point downwards, and dispense perfect whipped cream!
💡 Tip: Chill cream before whipping and always use high-fat cream for optimal results.
1.Fill your cream dispenser with heavy whipping cream and your favorite syrups.

2.Insert one 8g whipped cream charger into the cartridge holder.

3.Screw the holder onto the dispenser until you hear the gas release.

4.Shake for a 8-10 seconds, point downwards, and dispense perfect whipped cream!
💡 Tip: Chill cream before whipping and always use high-fat cream for optimal results.
Shop 8g Cream Charger Now

How to Use the 700g Cream Charger for Whipped Cream?

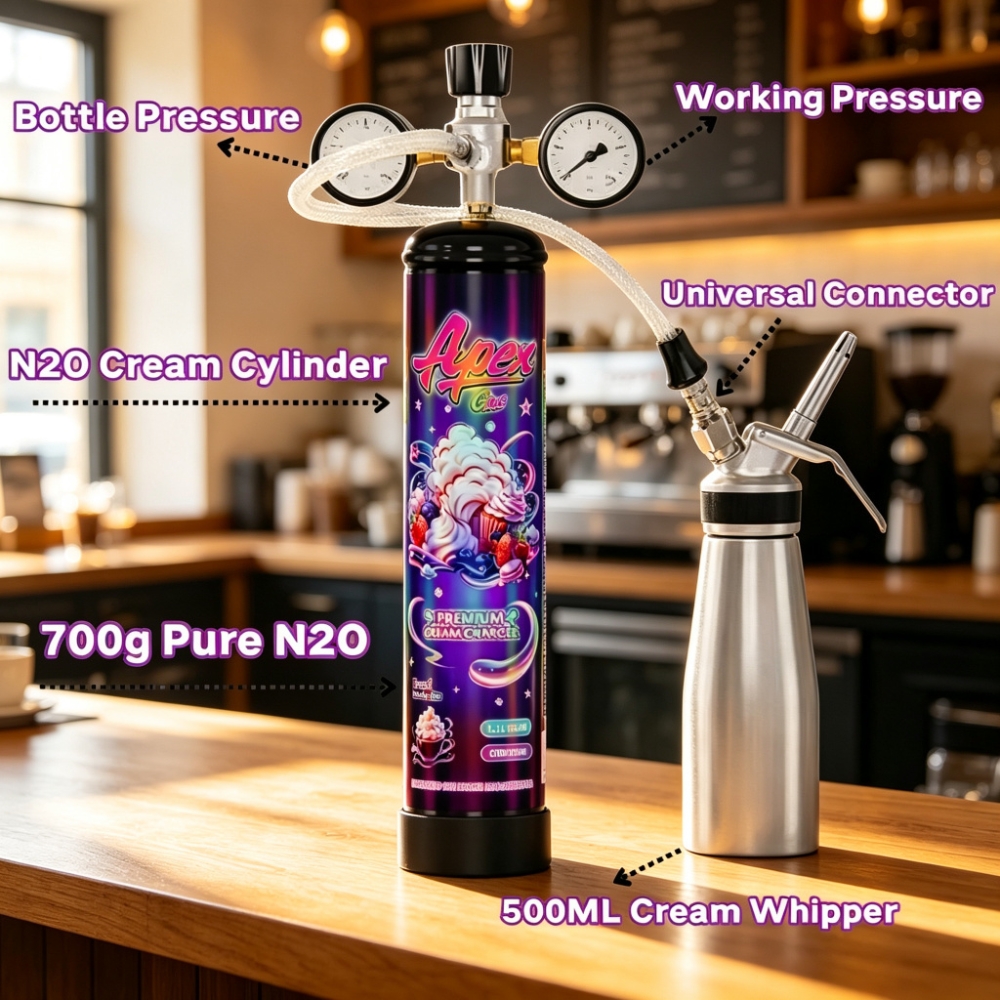
1. Open your cream dispenser and pour in an appropriate amount of heavy whipping cream. Add your favorite syrups or flavorings if desired. Close the dispenser securely. Do not overfill – leave room for the gas.

2. Screw the pressure regulator onto the top of the 700g Cream Charger. Hand-tighten only – no tools required.

3. Connect the regulator hose to the dispenser head. Please make sure the dispenser is properly sealed.

4. Turn the regulator valve clockwise to open, and hold for 6–10 seconds to charge the dispenser with gas. You will hear gas flowing – this is normal.

5. Disconnect the regulator hose from the dispenser.

6. Turn the dispenser upside down and shake vigorously 20 times.

7. Well done! Your delicious whipped cream is ready to serve!
1. Open your cream dispenser and pour in an appropriate amount of heavy whipping cream. Add your favorite syrups or flavorings if desired. Close the dispenser securely. 

2. Screw the pressure regulator onto the top of the 700g Cream Charger. 

3. Connect the regulator hose to the dispenser head.

4. Turn the regulator valve clockwise to open, and hold for 6–10 seconds to charge the dispenser with gas. 

5. Disconnect the regulator hose from the dispenser.

6. Turn the dispenser upside down and shake vigorously 20 times.

7. Well done! Your delicious whipped cream is ready to serve!
Shop 700g Cream Charger Now

How to Use Cream Dispenser with N₂O Cream Chargers

1.Prepare the dispenser. Remove the top of the whipped cream dispenser. Make sure the tip is screwed onto the head valve end, and check that the O-ring or gasket is properly in place on the underside of the head.

2.Add your ingredients. Pour in your cream and any preferred liquids, syrups, sugars, or extracts up to the max fill line. Do not overfill – leave room for the gas.

3.Attach the charger. For 8g chargers: Insert one 8g charger into the charger holder with the shorter end facing upward. Screw the holder onto the dispenser head and gently twist until you hear a hissing sound – this means the gas has been released.

For 700g cylinders: Attach the pressure regulator to the cylinder, connect the hose to the dispenser head, and turn the valve clockwise for 6–10 seconds to charge.

4.Shake and mix. Turn the dispenser upside down and shake vigorously 20 times to mix the nitrous oxide with the cream.

5.Dispense and enjoy! Point the dispenser downward, press the lever, and serve perfect whipped cream!
1.Prepare the dispenser. Remove the top of the whipped cream dispenser. 

2.Add your ingredients. Pour in your cream and any preferred liquids, syrups, sugars, or extracts up to the max fill line.

3.Attach the charger.
For 8g chargers: Insert one 8g charger into the charger holder. Screw the holder onto the dispenser head and gently twist until you hear a hissing sound.
For 700g cylinders: Attach the pressure regulator to the cylinder, connect the hose to the dispenser head, and turn the valve clockwise for 6–10 seconds to charge.

4.Shake and mix. Turn the dispenser upside down and shake vigorously 20 times to mix the nitrous oxide with the cream.

5.Point the dispenser downward, press the lever, and serve perfect whipped cream!
Shop Whipped Cream Dispenser Now


How to Use a Pressure Regulator?

1.You need a dispenser, n2o charger and some cream.

2.Open the dispenser. Pour an appropriate heavy whipping cream into it. Then close the dispenser.

3.Screw the pressure regulator onto your N20 bottle.

4.Connect the regulator to the dispenser. Please make sure the dispenser is sealed.

5.Turn clockwise to open the regulator for six to ten seconds. The normal working pressure is usually kept at around 12.

6.Disconnect the regulator from the dispenser.

7.Finally, turn over and shake the distributor 20 times.

8.Well down! The delicious cream is ready!

1.You need a dispenser, n2o charger and some cream.

2.Open the dispenser. Pour an appropriate heavy whipping cream into it. Then close the dispenser.

3.Screw the pressure regulator onto your N20 bottle.

4.Connect the regulator to the dispenser.

5.Turn clockwise to open the regulator for six to ten seconds. Normal working pressure is around 12.

6.Disconnect the regulator from the dispenser.

7.Finally, turn over and shake the distributor 20 times.

8.Well down! The delicious cream is ready!

Shop Pressure Regulator Now

How to Use a Helium Balloon Tank Kit?

1.Attach the black nozzle

Screw the black nozzle onto the helium tank tightly. Ensure it is secure before use.

2.Apply Balloon Protection Liquid (Recommended)

For longer-lasting balloons, add 1-2 drops of Balloon Protection Liquid inside each balloon, rub the liquid evenly inside,

this helps balloons float longer.

3.Turn on the helium tank

Turn the green button to open the valve and activate the inflation function.

4.Attach the balloon

Put the balloon over the black nozzle and make sure it's tight – hold it firmly to prevent gas from escaping.

5.Inflate the balloon

Press the black nozzle gently to begin inflating the balloon. Fill to your desired size – do not overfill.

6.Remove and tie

Remove the balloon from the nozzle, pinch the neck, and tie securely with a knot or ribbon. 

6.Close the valve

Once inflation is complete, turn the green button again to deactivate the inflation function. Close the valve to avoid leaking.


1.Screw the black nozzle onto the helium tank tightly.
2.Apply Balloon Protection Liquid (Recommended), add 1-2 drops of Balloon Protection Liquid inside each balloon, rub the liquid evenly inside.
3.Turn the green button to open the gas valve.
4.Put the balloon over the black nozzle, then gently press the nozzle down.
5.Tie securely with a knot or ribbon.
5.Close the valve to avoid leaking.


Shop Helium Tank Now